
I'm packing up my knives and I'm moving to WordPress.
Find me here.
Monday, September 13, 2010
Friday, September 10, 2010
Homemade Pickles

I have the most amazing set of classes this semester as I've mentioned before - one is named "Club Cuisine" but would be more appropriately named "History of Food, Food Ethics and Sustainability." It is literally the most kick ass class I could have dreamed of for my last Fall semester of my college career (!!!!!!!!!!!!!!!!!). Chef Knapp opened the class with the history of salt and the way colonization and settlement (including wars) can all be linked back to the discovery and movement of salt. China was the first recorded region to experiment with salt but their salt water lakes only produced fine salt crystals so they mixed it with water or other flavors to make it go farther (thus - soy sauce, fish sauce, etc.). Italy and Egypt both had salt mines which produced the prized large salt crystals and from there discovered the preservation powers salt had. Egypt was the first to eat the beloved olive, from soaking in a brine (salt and water, or salt and vinegar). Really, it is incredibly interesting.
So as part of our class last week we experimented with some "ancient techniques using modern methods." Namely, farmers' cheese, pickles, homemade ginger ale and stone-ground wheat bread leavened with yeast we captured from the air!
 To pickle, there are a few crucial steps (some of which I shamefully missed in my home attempt). First, a sterilized jar. Canning and pickling creates a vacuum inside of the jar so that the preservation or fermentation process will happen with only what is inside the jar. Having a dirty or unsterilized jar locks in the bacteria so that it grows within the can. Secondly, you need to have heat pressure on the inside to make that seal tight. If air gets in, botulism can develop and contaminate the food. Thirdly, Salt and Water is the "brine." Salt's properties allow it to preserve flavor and stop bacterial growth - amazing!
 I prefer sliced pickles rather than spears, but you can make them any way you would like. The stores do sell pickling cucumbers which are smaller and more bitter to the taste. I just bought two regular cucumbers and sliced them into circles. To sterilize your jars, submerge the jars and lids/screw caps in a pot of water. Bring the water up to boiling (the glass jar needs to be brought up to temp WITH the water so it does not break from temp shock) and boil for about 5 minutes. This sterilizes your jar. Fill your jar up with your pickles slices/spears. In a separate pot, boil water, vinegar, salt and pickling spices. Pour liquid, along with spices, into your jar of pickles. You can throw in a fresh sprig of dill. Seal the jar tightly - over the next few hours you might hear it "pop" as it makes its final seal. Leave for days, weeks or months until you are ready to try your pickles. I made four baby jars and am planning on opening each jar at a different time to observe the pickling process over time. Today I opened my first jar from yesterday's batch and found that it had a strong and nearly spicy pickled taste (black peppercorns were in my pickling spices jar) but you could still taste "cucumber." It also needed more salt, so I threw some more salt in the jar. However, make sure you always refrigerate your jars after you open them.
Veggie Pizza - whatever is in the fridge

Something that I have loved learning from being a freshie in the restaurant industry is learning how to use whatever you have in the store. If one special isn't selling on fish, we'll change the special the next night. Or make salmon cakes. Or if we have extra risotto from the night before, we make fried risotto balls as an appetizer special. The list goes on. It has been a helpful practice to develop at home - I am so finicky some weeks and I don't have an appetite, other weeks I go out with my friends too often and I don't hit the grocery store, or old groceries are sitting there going bad. Today I needed lunch and the smartest lunch is a lunch that you've already paid for, at the grocery store.
I had half of the pizza dough from last week's margherite as well as some cut veggies from a primavera I made for lunch earlier this week. Some marinara I saved from raviolis, a garlic clove, an overripe tomato, and some fresh mozzarella also left from the margherite. A little bit of Parmesan, which exhausts my cheese supply (sad), and some dehydrated mushrooms I bought last week and never used. Mushroom trick: I have always marveled at how quickly mushrooms go bad. I do most of my shopping at Publix, which breaks down their cardboard boxes of mushrooms and packs them into tiny plastic containers, tightly wrapped with plastic. I inquired about why my mushrooms go bad so quickly (slimy fishy) and why our cardboard-stored mushrooms at work last for a long week. The answer? Mushrooms need to breathe, and moisture makes them go bad. If they are stuck in a plastic container tightly wrapped (like we do for everything else to keep O2 out), they will sit in their own moisture and go bad. The solution? Take off the plastic wrap and leave them open air (thus the dehydration of my little guys) or better yet, throw them in a paper sack.
I am definitely taking a risk with the old marinara - highly acidic and highly basic foods are the first to go bad (thus, soft cheese. On the other end of the spectrum, tomatoes). But it smelled fine and let's be honest, it was probably packed with so many preservatives that marinara could live on in my refrigerator for a year and still be fine. So, I'll let you know in about 8 hours when the foodborne illness sets in (or not. hopefully not).
On top of my pizza went marinara, chopped garlic, sliced red onion, sliced green and red peppers, sliced mushrooms, a diced tomato, some fresh mozzarella and some shredded parmesan. Anything like this can be made from your leftovers and dwindling food supply - throw some things together that you enjoy together, add a tomato sauce base or an olive oil/salt and pepper/garlic base, and you can have a tasty little pizza without wasting a thing.
Up next: HOMEMADE PICKLES!
Saturday, September 4, 2010
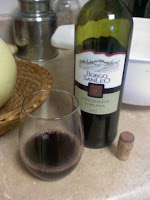
Pizza Margherite with Sangiovese
Just because I love to cook, and cooking is my job, does not mean I am good at keeping groceries in the house, or taking the extra 30 minutes to prepare a good meal at home. In fact, I am terrible at the day-to-day cooking. Thankfully, my job allows me to prepare my own meals at work and that helps, or I have lots of lunch dates with friends. But as I get older, strive to stick harder to my budget, be health conscious, AND try to develop myself in the culinary arts, I find that it is growing increasingly more important to take the time for meals at home.On top of that, I am so lucky to be in a program that offers a Wine & Spirits class on a truly comprehensive level. My professor, Dr. Strick, is an incredible instructor and has spent years traveling, tasting, and getting certified in wine education. So as an incentive for tasting more wines and drinking lots of LDL-lowering red wine, I have decided to budget for a daily glass - or two ;) - of red wine.
 My first endeavour in food and wine pairing was two nights ago, with a craving for pizza margherite (olive oil/garlic base, fresh mozzarella, fresh basil and tomatoes) and a complementary glass of red wine. I am not a huge red wine fan - the tannins, which are on the skins of every grape variety but only remain in the fermentation process for red wines, really pucker my mouth up ("dry" wine) and leave me feeling puckery, dry, cottonmouth-y. I don't like that feeling at the end of a night regardless of how much oaky nutty smokey goodness might be in that glass. So my choice of wine in varietals that I am familiar with is the Pinot Noir - sort of "in the middle" of the red wines, a little sweeter, not so dry, but full of flavor still. With all of this information, the gracious wine pro at Green's suggested I try an Italian varietal of grape, the Sangiovese. I enjoyed it with my pizza and boy was it yummy. A little dark fruity taste and perfect in between bites. Traditionally in Italy, each bite of a meal is spaced with a sip of wine, which helps you taste and the wine AND the food better in each bite. Mmm. What a way to enjoy good food and good wine.

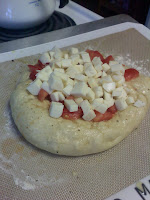
So - for the pizza: homemade or store-bought dough (I always buy Publix Bakery's dough and I always regret it. It never rolls out like I like, the gluten always breaks and it is just frustrating. Just make your own), tomatoes (sliced, diced, however you prefer. I prefer diced - I also like to squeeze my tomatoes in my hand to let some of that water out so it does not cook out in the pizza and make your pizza watery or soggy), fresh basil and fresh mozzarella (in water, add a touch of salt to bring out the flavors).
Roll out your pizza dough, rub down with minced garlic, olive oil, and sprinkle with salt and pepper. Par-bake crust (accordingly) and then top with tomatoes and fresh mozzarella, diced or shredded. A trick for fresh mozz is to stick it in the freezer for a short bit, probably just as long as you are getting your crust together and prepping your tomatoes and basil, and it will harden just a bit to make cutting, grating, slicing, etc. easier. Chiffonade some fresh basil but save until the end to retain full fresh flavor. Bake about 25-35 minutes at 375 (400 if thinner crust, but shorter cooking time) and after you pull it out, add the chiffonade basil, let it rest and then cut into it and enjoy with that glass of Sangiovese.

Thursday, September 2, 2010
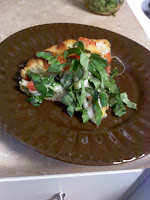
fresh artichokes (and hollandaise)

In my last post I said that I had so much to update on my blog. I am going to have to do it in a series - after starting one comprehensive post tonight, I realized that wine, fresh artichokes, hollandaise sauce, pizza, and chicken marsala can not be shown justice crammed into one tiny little space. So I will start with fresh artichokes - so miraculously tasty.
As far as artichokes are concerned, the first and last time I tasted a fresh artichoke was in a Mediterranean cooking class (mainly Northern Italy) I took two years ago, and I have not forgotten about the uniqueness of a fresh artichoke since (compared to the canned, weird tasting artichokes that are so common in American dishes and antipastos). Julia Child's The Way to Cook gave me a step-by-step lesson in steaming an artichoke. You can steam it, or you can boil it - I did both, one method for each artichoke, and I could not taste the difference. With that said, I would probably go with steaming for health purposes (oh - make sure you salt the water, whichever method you choose). Select a beautiful, squeaky green artichoke. When you get it home, rinse it off and make sure all the grit stuck in between the leaves is rinsed out. Take a heavy knife and cut the top end of the artichoke to remove the pricklies - from there, take scissors and remove each prickly off the top of each leaf. You can rub the exposed ends with a lemon wedge to prevent browning. Cut off the stem to the base of the artichoke, plop in a steamer and steam for ~35-45 minutes, or until the artichoke has lost its vibrant green and turned to a green/gray/brown color. As soon as you whisk up your hollandaise, it is ready to be devoured!!!!

For the hollandaise, I will only impart the amateur cooking method, since I am an amateur, and let's face it - you probably are too. Crack 3 eggs and save only the yolks for the hollandaise. Place the yolks in a metal mixing bowl (or heat resistant mixing bowl of some sort) and set over a sauce pan of boiling water (make your own double-boiler. This is the amateur method, so you don't have scrambled eggs before you get to the buttery eggy almost cheesy-like hollandaise because of your whimpy whisking). Add about 2 tablespoons of butter (set out to room temp) while OFF the heat. The butter will not whisk in right away because it isn't melted - but try to whisk until almost all of the butter is whisked in with the eggs. Add a touch of salt, a few drops of hot sauce, and fresh lemon juice from one lemon (trick: cut the lemon in half and squeeze over your cupped hand to catch the seeds. Let the juice trickle through your fingers or dump from your palm after removing the seeds). You can also add a touch of white pepper - I have had it with and without, and I prefer it WITH the white pepper. Set mixing bowl over the boiling water and continue to whisk while GRADUALLY adding in melted butter - this is called tempering the eggs, adding a little bit of heat at a time, to gradually bring them up to temp for them to start cooking but without OVERcooking which will result in scrambled eggs (yuck). Continue whisking vigourously (hold the bowl with a dish towel or an oven mitt with the other arm to keep it steady) and you will know your eggs have cooked when you can start to see the bottom of the mixing bowl while you whisk. The consistency should be a thick, mayonnaisey consistency and the taste will be divine goodness!
To serve: pour your hollandaise into a cute bowl and serve artichokes on appetizer plates (or one plate to share an artichoke - one artichoke goes a long way). Pluck off leaf by leaf, holding it by the tip, and dip the base into the hollandaise - with your teeth and tongue, drag the artichoke leaf out of your mouth, extracting the fleshy insides. Once you get the inside of the artichoke, you have reached the artichoke heart! Scrape off the fibers with a knife (they will rip up your insides; good food sometimes comes at a price) and once the fibers have been cleaned from the heart of the choke you can cut up the artichoke heart and eat it like a barbarian. Trust me, you will want to.

Monday, August 30, 2010
back to stay
Hello readers, I know it seems like I have deserted my blog. I have been thinking of it often but in the move to my new house, I have not had internet for a month! Now that I am re-connected to the world, I plan on keeping a regular schedule of posting and updating.
I'd like to start off by posting a recent special we ran at Villa Tronco for our filet. $26 for the most amazing thing you'll ever put in your mouth (unless you are a vegan, and well then it would be your worst nightmare). Are you ready?
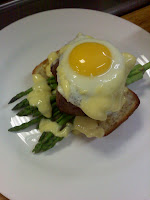
Toasted garlic ciabatta bread with blanched asparagus on top, with one medium-rare filet, a sunny-side up egg stacked on top with Hollandaise drizzled over all of it. YES! That just happened (and in Columbia, South Carolina, at that). We were so proud. Of course we had to try it out for ourselves and let the waitstaff know how to sell it, so we made one order and split it before dinner service on Thursday night.
Here's to drooling...
I'd like to start off by posting a recent special we ran at Villa Tronco for our filet. $26 for the most amazing thing you'll ever put in your mouth (unless you are a vegan, and well then it would be your worst nightmare). Are you ready?
Toasted garlic ciabatta bread with blanched asparagus on top, with one medium-rare filet, a sunny-side up egg stacked on top with Hollandaise drizzled over all of it. YES! That just happened (and in Columbia, South Carolina, at that). We were so proud. Of course we had to try it out for ourselves and let the waitstaff know how to sell it, so we made one order and split it before dinner service on Thursday night.
Here's to drooling...

Wednesday, August 4, 2010
Summer Pasta Salad

One thing I have been aiming to do in my eating is to make sure my vegetables aren't losing their enzymes and their nutritious qualities. I have said before that I read once that 118 degrees is the maximum temp for veggies to retain their health benefits. Yesterday I needed a quick lunch before hitting the road to see Veronica and Isaac and I had Piccolini (tiny farfalle) in my cupboard and some veggies in my fridge. I cooked the pasta and strained it, then tossed in light olive oil, some minced garlic (2 cloves), diced tomato (1 vine ripe tomato), a few sliced baby portabellas (maybe 4 or 5) and some spinach (a handful, chiffonade). Don't forget the s & p. I also had some sliced Boar's Head Havarti from Publix deli so I roughly tore it into little pieces and tossed - it was perfect! The veggies were just warm from being mixed with the freshly cooked pasta but they weren't COOKED. Still had full taste, full nutrients, and my oh my it made for a tasty summer side to a turkey sandwich. Today I had the pasta as my main course with a bowl of fresh cherries on the side (on sale at Publix for $2.49/lb). Try it!

Subscribe to:
Posts (Atom)
